
![]() 26th of September 2024
26th of September 2024
![]() Argsha Test Author
Argsha Test Author
How to add your website in google search console
Introduction:
Google Search Console or google webmaster tools is a free tool from Google that is used to check the performance of your website. It helps the website to rank in the google search engine. It is a complete power tool offered by Google to help the website owner check how your website is present in google search results. It is an important step of Search Engine Optimization(SEO).
Google Search Console provides a lot of data about your website; it keeps your site updated and provides the site errors, security issues, indexing issues, and many more. It also provides the data like how many clicks are done on pages and how many impressions are created throughout the site.
It is not enough to add your website to the google search console, but also it has to be necessary to monitor your site regularly and correct the problems if occurred. Many of us add the site in the search console, but they do not monitor the site; it is a destructive manner, and you miss the powerful features of the google search console that might help you reach your site in better search ranking. Google Search Console has many features.
Performance:
The performance will help you to know the impressions and clicks on the page.
Coverage:
Coverage shows the pages are indexed in google search results it also shows how many pages are not indexed in google search and why!.
Sitemap:
The sitemap will help you to decide how many pages of your website will index in the google search console.
Mobile Usability:
It helps you to know if any issues are found in the mobile version of your site.
Security and manual actions:
It shows the security issues on your site and also helps you to know the necessary actions to take.
URL Inspection:
It helps the Website owner to check individual pages whether any search-related issues are found or not.
Google Search Console will help you check your website’s performance in search, and if any technical issue is found, it enables you to overcome it.
The process of adding your website to the google search console and how to monitor the site regularly is very easy; following my instructions and getting the help to rank your site higher means your website traffic will be high.
Add website to google search console:
It is very easy to add your site in the google search console or google webmaster tools. Just copy the link https://search.google.com/search-console and paste it into your browser tab and next click on the start now button.

Now, You will need to login into your Google or Gmail account. After your successful login, you will be asked to enter your website link to verify, and you will get two verification processes: a domain name and the second one is URL Prefix. I suggest you take the URL Prefix process because it is a short and less time taking approach.
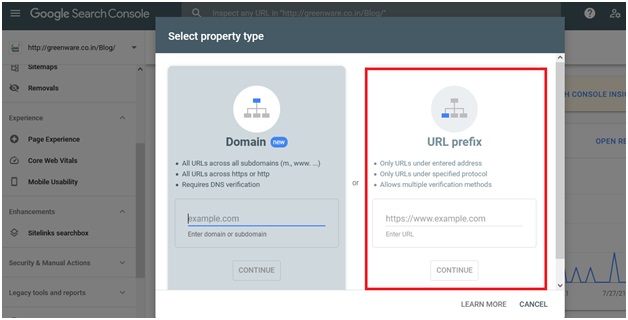
Keep in mind that you should always give the Link in URL Prefix, which is only open by one Link. If it is open by HTTP and HTTPS in both google search engines will decide these are two different websites.
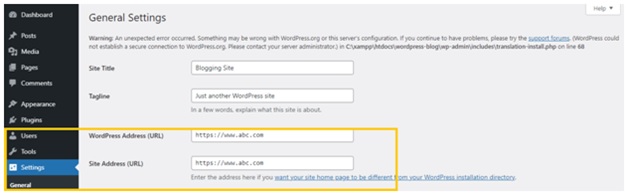
If WordPress develops your website, you need to change the general setting there. you will get the options WordPress address(URL) and site address(URL). These two options will be the same.
If your site is developed by custom PHP then you need to change in .htaccess file. I have given the code in below.
RewriteEngine On
RewriteCond %{HTTPS} off
# First rewrite to HTTPS:
# Don't put www. here. If it is already there it will be included, if not
# the subsequent rule will catch it.
RewriteRule .* https://%{HTTP_HOST}%{REQUEST_URI} [L,R=301]
# Now, rewrite any request to the wrong domain to use www.
# [NC] is a case-insensitive match
RewriteCond %{HTTP_HOST} !^www\. [NC]
RewriteRule .* https://www.%{HTTP_HOST}%{REQUEST_URI} [L,R=301]
After providing the site URL in the URL prefix click on continue and wait…Nex process is to verify your site ownership.
Verify your Website Ownership:
After submitting the URL you need to verify your ownership. There are several options are available by which you can prove to Google that you are the actual owner of that website.
HTML file:
Google provides you an HTML file that would be uploaded under the root directory.
HTML Tag:
Google provides you with an HTML tag that would be placed under your website header.
Google Analytics:
you can verify by linking to your google analytic account.
Google Tag Manager:
you can verify your website by linking to the google tag manager.
Domain Name Provider:
By this option, you will have to add a new DNS record to your web hosting account.


After selecting any one step you have to click on Done and need to wait a few hours to be verified.
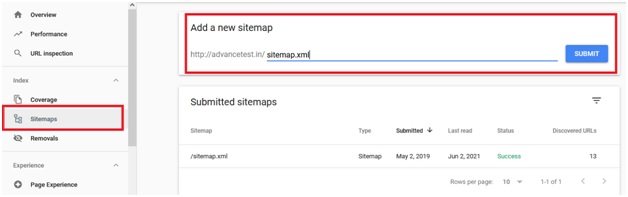
Add XML Sitemap:
You can tell the google search engine bots which are the pages that will be indexed in google ranking. A sitemap is a file contained in your root directory where the pages are listed to be in google ranking and you just simply add the path of your sitemap from the left menu sitemaps option. Google crawl will be known by this sitemap that which are the pages will be indexed in google search results.
Some online sites are available to create your sitemap but you can generate it own.
Fixing Crawling Issues:
Google search console will help you to check your site’s performance and give you the data of the site errors, indexing issues, Broken links, security issues, etc. it will be helpful if you have the data of the problems you can take easy actions on it.
I will suggest you do regular basis checkups in the google search console and if you find any problems there do instant actions to solve the issue.
If you follow the instructions you will definitely reach the goal.
Related Blogs
![]() 26th of September 2024
26th of September 2024
![]() By Argsa
By Argsa

![]() 2nd of November 2024
2nd of November 2024
![]() By Argsa
By Argsa
Sourav Mukherjee
Sourav Mukherjee