
![]() 10th of February 2022
10th of February 2022
![]() By Argsa
By Argsa
Learn Codeigniter 4 step by step
Table of Contents
- Introduction
- Install Codeigniter 4
- Directory Structure
- Remove Public from URL
- Routes
- Controller
- Model
- Database Connection With Model
- How to find Error
- How to Insert Data into Database
- How to fetch data from Database
- How to edit data in the database
- How to Update Data in Database
- How to Delete data from the database
- Form Validation
- How to register in Codeigniter 4
- Login
- Session
- File Upload
- Image Manipulation
Introduction:
Codeigniter is an application development framework written in PHP, other words it is a framework of PHP. This framework is introduced to reduce the execution time of any project basically it makes the application faster than others that are developed on another platform. Codeigniter provides a set of libraries and a very simple interface that makes the projects easier, it needs less coding for a given task and it is only needed to know the use of these libraries properly.
Codeigniter is the only framework that has no configuration setup, it is very simple and lightweight. You do not require any command line to set up the projects.
Codeigniter does not force you to follow any specific coding rules but you can be able to choose your own way of coding.
Install Codeigniter 4:
It is very easy to download and install Codeigniter 4 on your local machine but you can work on a live server also. I will show you in local machine.
First of all, to run the Codeigniter 4 project on your local computer you just have to install the XAMPP server or you can install some other server too but I will run the codeigniter4 project using the XAMPP server.
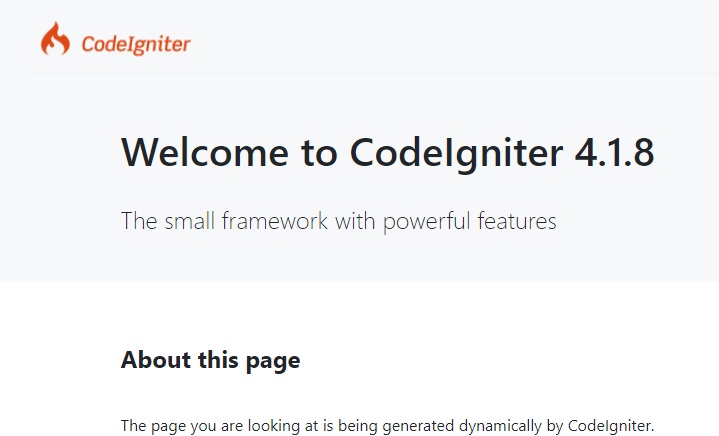
Now, you need to download the Codeigniter 4 project file from the official site of Codeigniter, and after download, this project file will be placed under the htdoc of the XAMPP server(C drive->XAMPP->htdoc->your project file), now type localhost/project folder name/public in browser and it will show the default Codeigniter 4 page.
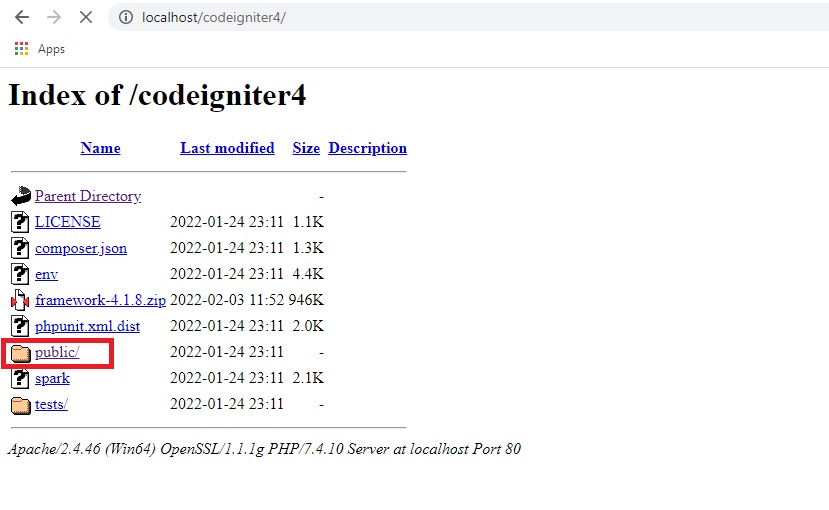
Directory Structure:
If you download a fresh Codeigniter 4 file you will get five folders in it and these are app, public, system or vendor, tests, writable. Each of the directories has an important role in developing an application.
- App: This is the main directory, all your code will be live here. It is having some other directories.
- Config: this directory Stores the configuration files.
- Controllers: Controllers provide the flow of your program.
- Database: it provides the connection with the database.
- Filters: It will store the filter classes that can run before and after the controller.
- Helpers: Helpers store collections of standalone functions for future use.
- Language: Multiple language support reads the language strings from here.
- Libraries: Useful classes that don't fit in another category.
- Models: Models work with the database to represent the business entities.
- ThirdParty: ThirdParty libraries that can be used in applications.
- Views: Views make up the HTML that is displayed to the client.
- Public: This directory contains the main .htaccess and index.php file and also store the CSS, Javascript, Images for your application.
- System: This directory is made up of the framework itself, you do not need to change anything here.
- Tests: This directory is created to test your files. This directory is having some classes that you can use but no need to transfer these files to a live server.
- Writable: This directory holds any directories that might need to be written to in the course of an application’s life. This includes directories for storing cache files, logs, and any uploads a user might send.
Remove Public from URL:
If you want to remove the public word from the URL you just need to go to the public folder of your application and copy the .htaccess file and index.php file and paste it under the main directory where the public directory and the other directories are held.
$pathsConfig = FCPATH . '../app/Config/Paths.php';
Now just remove the double dots(..) from the above line in index.php file.

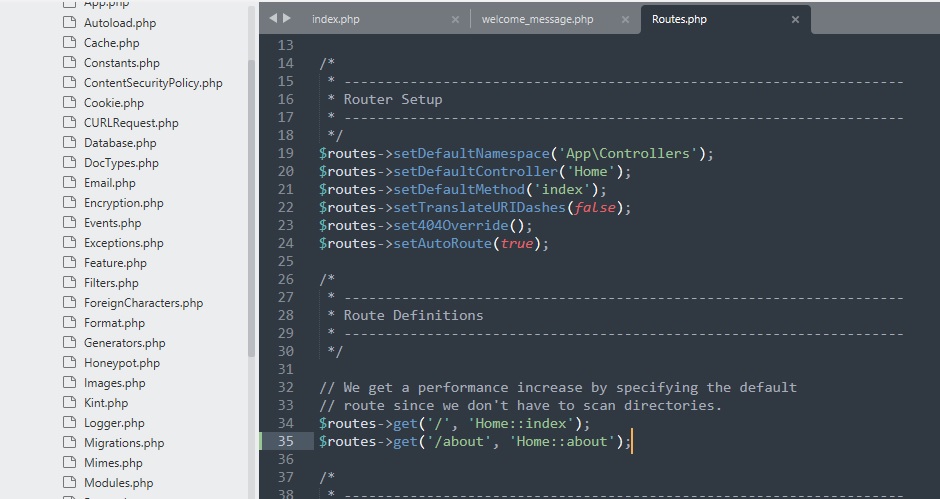
Routes:
The route basically indicates the path, how the controller is called a class with the parameters, and passes to the view with a URL request.
<?php
namespace App\Controllers;
class Home extends BaseController
{
public function index()
{
return view('welcome_message');
}
public function about()
{
return view('about');
or
echo “hi”;
}
}
?>
Here you can call the page created in view or you can directly print the value.
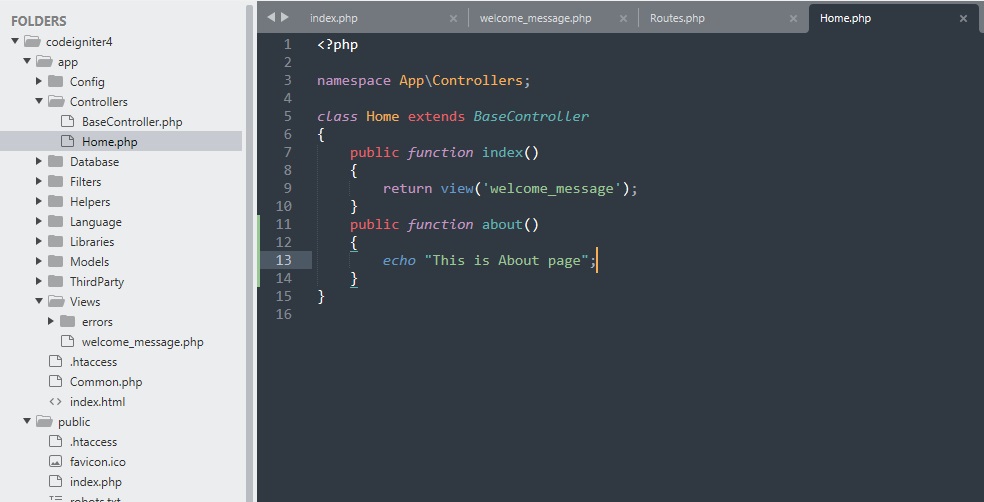
Controller:
The controller is responsible for taking the HTTP requests and generating the web pages. The controller is the pole between models and views it received the HTTP request and passes it to the views and models to process the information.
<?php
namespace App\Controllers;
class Admin extends BaseController
{
public function contact()
{
return view('contact');
}
}
Here all the created controllers should be extended from the BaseController.
Public function contact() is a method created under the Admin controller and it returns a view name is contact.php
If you want to run the contact.php page you should create the route.
$routes->get('/contact', 'Admin::contact');
Model:
Models are the PHP classes that are designed to work with information in the database. Models have created the connections with the database and performed the operations in the controller and the controller passes the results in view.
<?php
namespace App\Models;
use CodeIgniter\Model;
class AdminModel extends Model
{
// ...
}
Database Connection With Model:
First of all, create a database and make the connection with your project, go to the project file and open the app folder under the app you will find the config folder now you have to open the database.php file, this file is responsible to create the connection.
public $default = [
'DSN' => '',
'hostname' => 'localhost',
'username' => 'root',
'password' => '',
'database' => 'codeigniter4',
'DBDriver' => 'MySQLi',
'DBPrefix' => '',
'pConnect' => false,
'DBDebug' => (ENVIRONMENT !== 'production'),
'charset' => 'utf8',
'DBCollat' => 'utf8_general_ci',
'swapPre' => '',
'encrypt' => false,
'compress' => false,
'strictOn' => false,
'failover' => [],
'port' => 3306,
];
<?php
namespace App\Models;
use CodeIgniter\Model;
class AdminModel extends Model
{
protected $table="users";
protected $allowedFields=['name','email','password'];
}
From the above model function, it is clear that you have to indicate the table name and you should tell here the variables that will be passed.
Now in Controller, if you want to print the values from the table you have to do the below.
<?php
namespace App\Controllers;
use App\Models\AdminModel;
use CodeIgniter\Controller;
class Admin extends BaseController
{
public function contact()
{
return view('contact');
}
public function userdata()
{
$model=new AdminModel();
print_r($model->findAll());
}
}
How to find Error:
If you want to display an error just go to the root folder and open the env file.
CI_ENVIRONMENT = production-> here the production will be developed.
Next open the Boot folder under the app and in the two files development.php and production.php you have to change ini_set('display_errors', '1');
How to Insert Data into Database:
It is very easy to insert data into the database, you can insert data by using query builder or you can insert data using the model.
First of all, you need to create an HTML form that passes the data to the model and controller.
Secondly, you need to change the base URL.
public $baseURL = 'http://localhost/codeigniter4/';
public function insertData()
{
// using queryBuilder
$data=[ 'name'=>$this->request->getVar('name'),
'email'=>$this->request->getVar('email'),
'password'=>$this->request->getVar('password')
];
$db_connection=\Config\Database::connect();
$table=$db_connection->table('users');
$table->insert($data);
// using model
$data_insert=new AdminModel();
$data_insert->insert($data);
}
View Section
<!DOCTYPE html>
<html lang="en">
<head>
<title>Insert data</title>
<meta charset="utf-8">
<meta name="viewport" content="width=device-width, initial-scale=1">
<link rel="stylesheet" href="https://maxcdn.bootstrapcdn.com/bootstrap/3.4.1/css/bootstrap.min.css">
<script src="https://ajax.googleapis.com/ajax/libs/jquery/3.5.1/jquery.min.js"></script>
<script src="https://maxcdn.bootstrapcdn.com/bootstrap/3.4.1/js/bootstrap.min.js"></script>
</head>
<body>
<div class="container">
<h2>Insert Data form</h2>
<form action="<?php echo site_url('Admin/insertData');?>" method="post">
<div class="form-group">
<label for="namr">Name:</label>
<input type="text" class="form-control" id="name" placeholder="Enter Name" name="name">
</div>
<div class="form-group">
<label for="email">Email:</label>
<input type="email" class="form-control" id="email" placeholder="Enter email" name="email">
</div>
<div class="form-group">
<label for="pwd">Password:</label>
<input type="password" class="form-control" id="pwd" placeholder="Enter password" name="password">
</div>
<button type="submit" class="btn btn-default">Submit</button>
</form>
</div>
</body>
</html>
How to fetch data from Database:
If you want to fetch the data from a table, you simply need to create a view page, controller page, and model page.
In Controller
public function fetch()
{
$table=new AdminModel();
$data['table']=$table->findAll();
return view('fetch',$data);
}
In view
<table>
<tr>
<th>Name</th>
<th>Email</th>
</tr>
<?php
foreach($table as $t)
{
?>
<tr>
<td><?=$t['name']?></td>
<td><?=$t['email']?></td>
<?php
}
?>
</tr>
</table>
How to edit data in database:
To update a record into the database we need to fetch the row from the table and show it in a form.
public function edit($id)
{
$table=new AdminModel();
$data['table']=$table->where('id',$id)->first();
return view('edit',$data);
}
This $id is the row id passed from the table list. Look into the below form where we fetched the data in the text box.
<form action="<?php echo site_url('Admin/updateData');?>" method="post">
<div class="form-group">
<label for="namr">Name:</label>
<input type="text" class="form-control" id="name" placeholder="Enter Name" name="name" value="<?php echo $table['name']?>"
</div>
<div class="form-group">
<label for="email">Email:</label>
<input type="email" class="form-control" id="email" placeholder="Enter email" name="email" value="<?php echo $table['email']?>">
</div>
<button type="submit" class="btn btn-default">Update</button>
</form>
How to Update data in Database:
After fetching the row we just need to run the update query.
. public function updateData()
{
$id=$this->request->getVar('id');
$data=[ 'name'=>$this->request->getVar('name'),
'email'=>$this->request->getVar('email'),
'password'=>$this->request->getVar('password')
];
$data_insert=new AdminModel();
$data_insert->update($id,$data);
return redirect()->to(base_url());
}
How to Delete data from the database:
If you want to delete a row you have to send the specific id of the table to the controller and the controller will delete the row by the deleted class available in Codeigniter.
public function delete($id)
{
$table=new AdminModel();
$table->where('id',$id)->delete();
return redirect()->to(site_url('Admin/fetch'));
}
Form Validation:
If you want to validate your data before entering it into the database, there is a very easy method is available in Codeigniter 4.
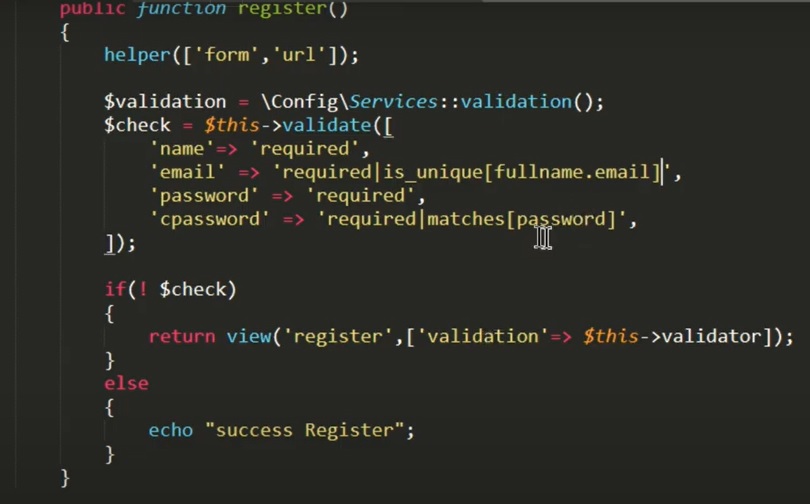
How to register in Codeigniter 4:
The registration process needs a form of the name, email id, password, and confirm password but this form can be different as per the requirements.
Here I will show you the basic fundamental form for a registration process.
To complete a registration process in Codeigniter 4 you must have to create a model, controller, and a form.
public function registerData()
{
helper(['form','url']);
$validation=\Config\Services::validation();
$check=$this->validate([
'name' => 'required',
'email' => 'required|is_unique[users.email]',
'password' =>'required',
'confirm_password' => 'required|matches[password]'
]
);
if(! $check)
{
return view('register',['validation'=>$this->validator]);
}
else
{
$encrypter=\Config\Services::encrypter();àthis class is used to encrypt your password
$data=[ 'name'=>$this->request->getVar('name'),
'email'=>$this->request->getVar('email'),
'password'=>$encrypter->encrypt($this->request->getVar('password')),
];
$data_insert=new AdminModel();àmodal called
$data_insert->insert($data); àinsert query called
}
}
Model
class AdminModel extends Model
{
protected $table="users";
protected $allowedFields=['name','email','password'];
}
Here Admin Model is the class name.
View
<?php if($validation){echo $validation->listErrors();} ?>-àthis will print the errors if created from the validator.
<form action="<?php echo site_url('Admin/registerData');?>" method="post">
<div class="form-group">
<label for="namr">Name:</label>
<input type="text" class="form-control" id="name" placeholder="Enter Name" name="name">
</div>
<div class="form-group">
<label for="email">Email:</label>
<input type="email" class="form-control" id="email" placeholder="Enter email" name="email">
</div>
<div class="form-group">
<label for="pwd">Password:</label>
<input type="password" class="form-control" id="pwd" placeholder="Enter password" name="password">
</div>
<div class="form-group">
<label for="pwd">Confirm Password:</label>
<input type="password" class="form-control" id="pwd" placeholder="Enter password" name="confirm_password">
</div>
<button type="submit" class="btn btn-default">Submit</button>
</form>
Login :
Here I will show you how to login into your site by using email id and password.
First create a login form <!DOCTYPE html>
<html lang="en">
<head>
<title>Login</title>
<meta charset="utf-8">
<meta name="viewport" content="width=device-width, initial-scale=1">
<link rel="stylesheet" href="https://maxcdn.bootstrapcdn.com/bootstrap/3.4.1/css/bootstrap.min.css">
<script src="https://ajax.googleapis.com/ajax/libs/jquery/3.5.1/jquery.min.js"></script>
<script src="https://maxcdn.bootstrapcdn.com/bootstrap/3.4.1/js/bootstrap.min.js"></script>
</head>
<body>
<div class="container">
<h2>Login</h2>
<form action="<?php echo site_url('Admin/login');?>" method="post">
<div class="form-group">
<label for="email">Email:</label>
<input type="email" class="form-control" id="email" placeholder="Enter email" name="email">
</div>
<div class="form-group">
<label for="pwd">Password:</label>
<input type="password" class="form-control" id="pwd" placeholder="Enter password" name="password">
</div>
<button type="submit" class="btn btn-default">Login</button>
</form>
</div>
</body>
</html>
Next set the route
$routes->get('/login', 'Admin::login');
After that we have to create the model
<?php
namespace App\Models;
use CodeIgniter\Model;
class AdminModel extends Model
{
protected $table="users";
protected $allowedFields=['name','email','password'];
}
And Finally, we will work on the Controller
public function login()
{
$user=new AdminModel();
$res=$user->where('email',$this->request->getVar('email'))->first();
if($res !=NULL)
{
if($res['password']==$this->request->getVar('password'))
{
echo "Login Successful";
}
else
{
echo "Invalid email/Password";
return view('login');
}
}
else
{
return view('login');
}
}
Session:
The session function is used to store the data for future use, it is very easy to use.
$session=session();
This will indicate that the session has started and if you want to set the value in session you have to do the below.
$session->set(‘username’,’Biswajit Manna’);
$session-> username (this will print the name, Biswajit Manna).
File Upload:
To upload a file you have to create a form just like below
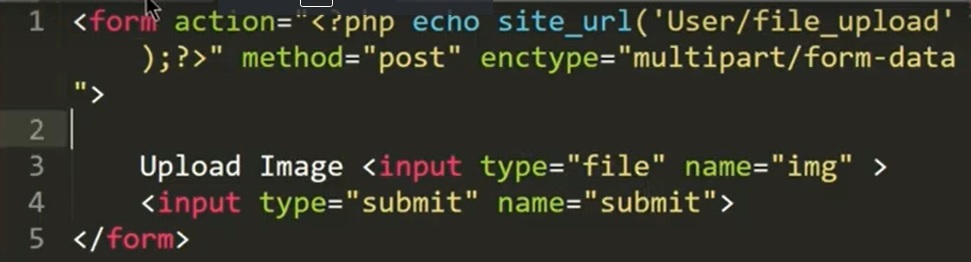
There is a lot of techniques are available to store the images, here I will show you the two.
First
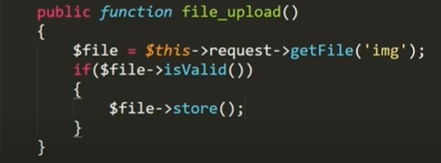
Second
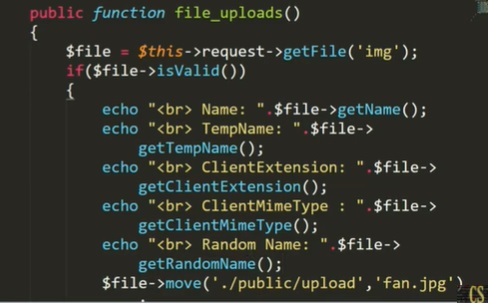
Here you will need to create a folder upload under the public directory and above all the echo in the images will show the image details like below.
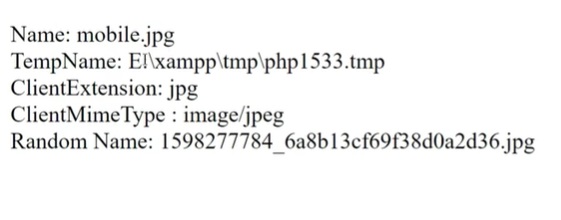
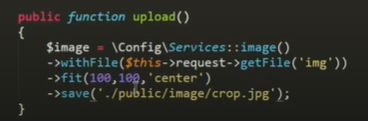
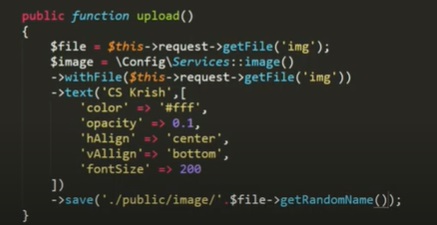
Image Manipulation:
Codeigniter 4 offers you to store images in different formats like you can crop the images, you can rotate, can flip vertically, or you can make a watermark on the images at the uploading time.
For cropping
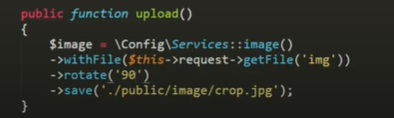
For rotate
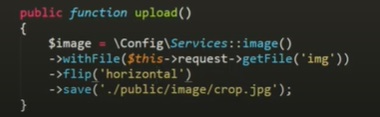
For Flip vertically or horizontally
For watermark
Related Blogs

![]() 31st of December 2021
31st of December 2021
![]() By Argsa
By Argsa
![]() 8th of January 2022
8th of January 2022
![]() By Argsa
By Argsa